Printing - Gina Cody School of Engineering and Computer Science
Faculty and staff at the Gina Cody School of Engineering and Computer Science have access to a unique printing service.
The service is available with two types of printing options for user-managed systems that use ENCS quota. Users can print through the SAMBA server or through a Line Printer Remote (LPR) port. The main difference between these two choices is how printing quota is managed. For more information, review the comparison of printing methods.
Who can use it?
Faculty and staff within the Gina Cody School.
How much does it cost?
There is no cost associated with this service.
For more information about how printing quota is managed, review the comparison of printing methods.
How to get it?
- Faculty and staff with a valid ENCS account are granted printing quota automatically.
- To request assistance setting up a printer on a user-managed machine, contact the Service Desk.
Service availability
24/7
Documentation
| Samba printing | LPR printing | |
|---|---|---|
| How is quota managed? |
Authenticated users. | Machine/IP address. |
| Do you need to know the printer model? |
No. | Yes - choose 'available printers'. |
| Do you need to know the printer name? |
Yes. | Yes. |
| Printer driver installation. | Automatically downloaded and installed. | Manually downloaded and installed. |
| Post driver installation configuration. | No. | 3rd tray, memory, duplex |
| How often do I authenticate? | Must authenticate every time before printing. |
Authentication is on the server side. No need for user to authenticate. |
| How simple is the installation? | Simple - most of the steps are automatic. | Medium - some post-install or configuration necessary. User may need the Windows CD to install print service for UNIX before using the LPR print service (info in documentation section of this page). |
| Ease of use. | Medium - users need to authenticate before printing. |
Easy - works like a local printer. |
| Support for non-ENCS accounts | No - only available for current ENCS users with an ENCS account. | Yes - all valid local computer accounts can print. |
| Available printers. | All ENCS printers. | All ENCS printers. |
Before adding an LPR printer port, you must verify that the LPR Port Monitor Service (lpr) is enabled on your system. To verify, open up Command Prompt, type in lpr /? and press Enter. If the lpr is enabled, lpr help information will be displayed.

If lpr is not enabled, follow these steps:
- Open Control Panel.
- Select Programs and Features.
- Select Turn Windows features on or off from the menu on the left.
- In the Windows Features on or off window that appears, click on the + in front of Print and Document Services and check the boxes for LPD Print Service and LPR Port Monitor.
- Click OK.

Now you are ready to add an LPR printer port. For full instructions, choose your operating system from the options below.
Windows 7
- Note down the manufacturer and model number of the printer to which you want to send print jobs. For example: HP LaserJet 4200 or Brother HL 5340.
- Open Control Panel, choose Devices and Printers, and click Add a Printer.

- Choose Add a Local Printer from the dialog box.

- Select Create a new port and choose LPR Port as the Type of port from the dropdown menu.
- Click Next.

- Enter the Name of server providing lpd as printhost.encs.concordia.ca.
- Enter the appropriate Name of printer or print queue. For example: pool.

- Click OK.
- Choose the exact manufacturer and printer name from the list as shown in the figure:
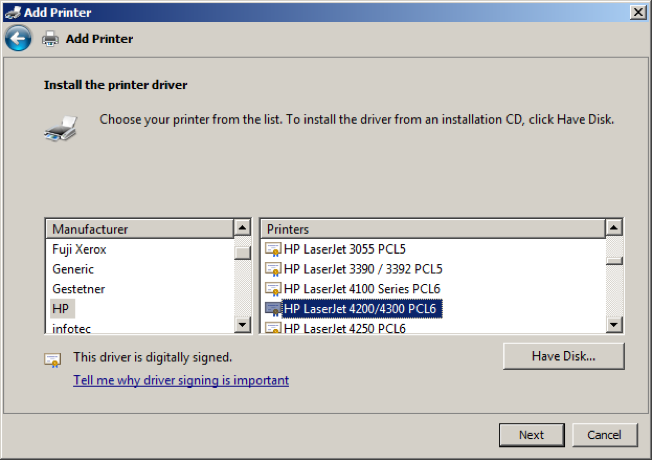
- Click Next.
- Use the driver that is currently installed.

- Click Next.
- Enter the printer name.

- Click Next.
- Click Print a test page to see if it works properly.


- Click Close.
- Click Finish.
- Open Control Panel and choose Devices and Printers.
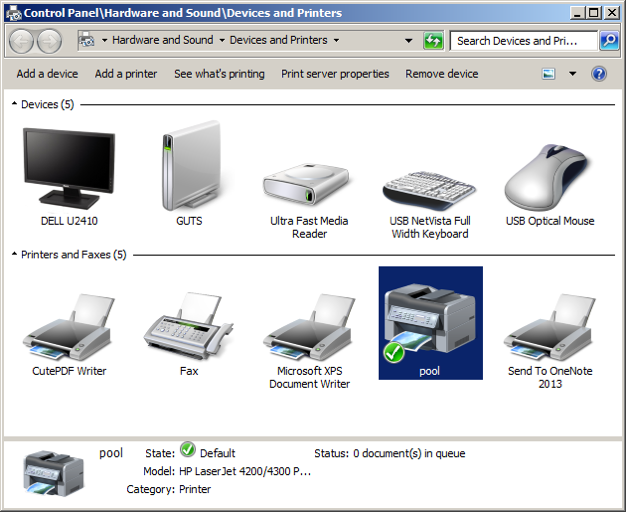
- Right click the printer pool and select Printer properties. Check that Duplex Unit is installed

Note: In case the required drivers are not available on the list, download it from the corresponding manufacturer’s site by entering the model number of the printer and saving the printer driver to the disk. Right click the .exe file and extract it to a folder. Choose Have Disk… and browse to the saved path. Select the .inf file from the driver folder. See an example below which installs LPR in Windows 10.
Windows 10
- Type Printers and scanners in the search field and then select Printers & scanners.

- Click Add a printer or scanner.

- Click The printer that I want isn’t listed.

- Select Add a local printer or network printer with manual settings, then click “Next”.

- Select Create a new port.
- Type of port: LPR Port
- Click Next.

- Enter the Name or address of server providing lpd: printhost.encs.concordia.ca
- Enter the Name of the printer
Example: miecolour1 - Click OK.

- Download the driver from HP web Site and extract the .exe file to a folder on your Desktop called upd-ps-x64-6.6.5.23510. Then
- Click Have Disk and download Universal PostScript Driver.

- Click Browse.

- Browse to the saved path and select the .inf file from the folder you created.

- Click Open.

- Click OK.

- Select HP Universal Printing PS, then click Next.

- Enter printer name: miecolour1 and click Next.

- Select Do not share this printer and then click Next.
- Click Print a test page to check if it is working properly.

- Click Close and Finish.
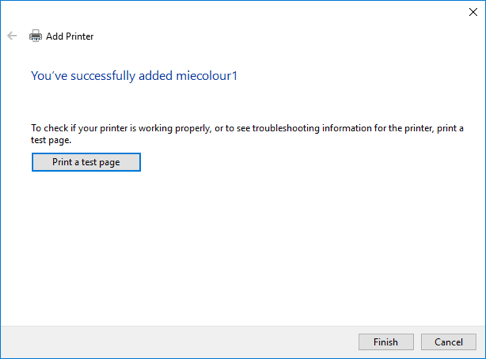
- Click on Apple’s logo and select System Preferences.

- Select the Printers & Scanners option.

- A new window will open. Click on + to add a printer.

- Select IP from the options.

- Fill out the information as detailed below:
- Address: printhost.encs.concordia.ca
- Protocol: Line Printer Daemon – LPD
- Queue: spectrum
- Name: spectrum
- Location: the location you want to use
- Use: Generic PostScript Printer
- Click Add.

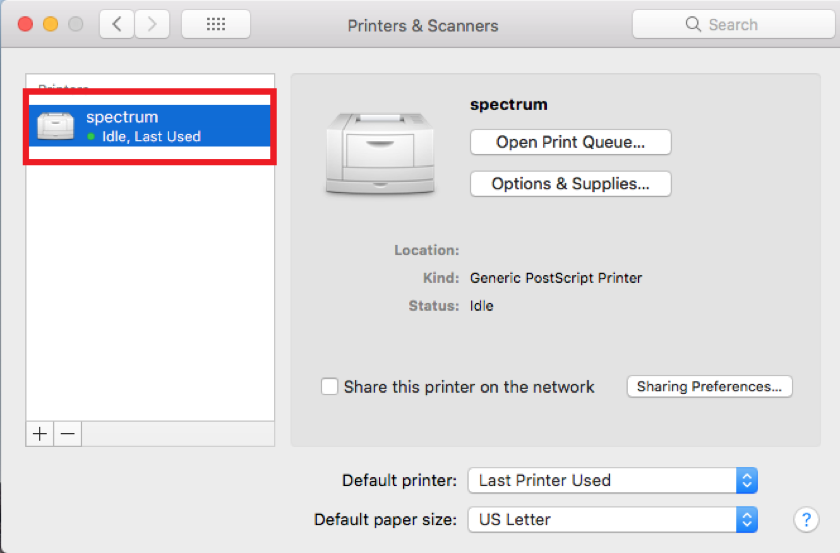
- You’ll see the following screen:
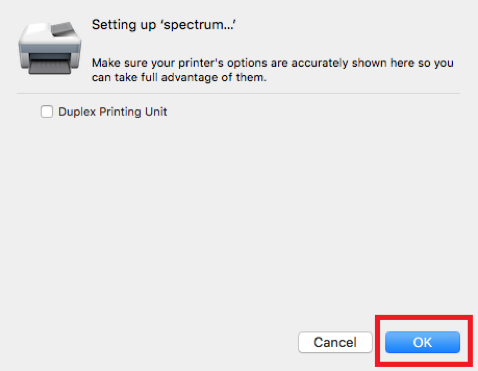
- Click OK.
- Log in as root.
- Go to System > Administration > Printing.

- Select New at the top of the window.

- Click Adjust Firewall, if prompted.
- Select LPD/LPR Host or Printer on the Select Device window.
- On the right side, enter the host name as: printhost.encs.concordia.ca and provide the printer name in the Queue field (example: pen2).
- Click Forward.

- Make sure the Select Printer from Database option is selected.
- From the list of Maker, select printer Manufacturer (example: HP). Click Forward.
- If the brand of the printer is not listed, skip to the last 2 steps of these instructions.

- Select the printer model from the list on left side, and then select the option with Postscript. Click Forward

- Check the Duplex Unit checkbox and select Installed in Printer Disk option. Click Forward.

- In the Printer Name field, provide the name of the printer (example: pen2).
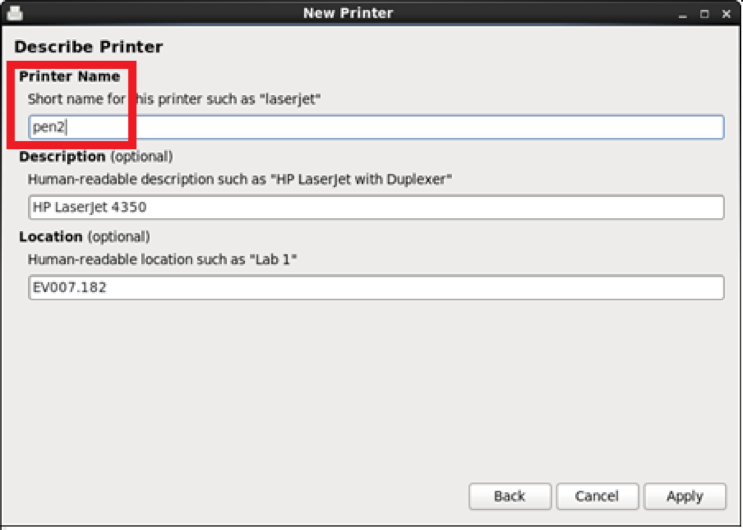
- Click Apply - the printer will be installed.
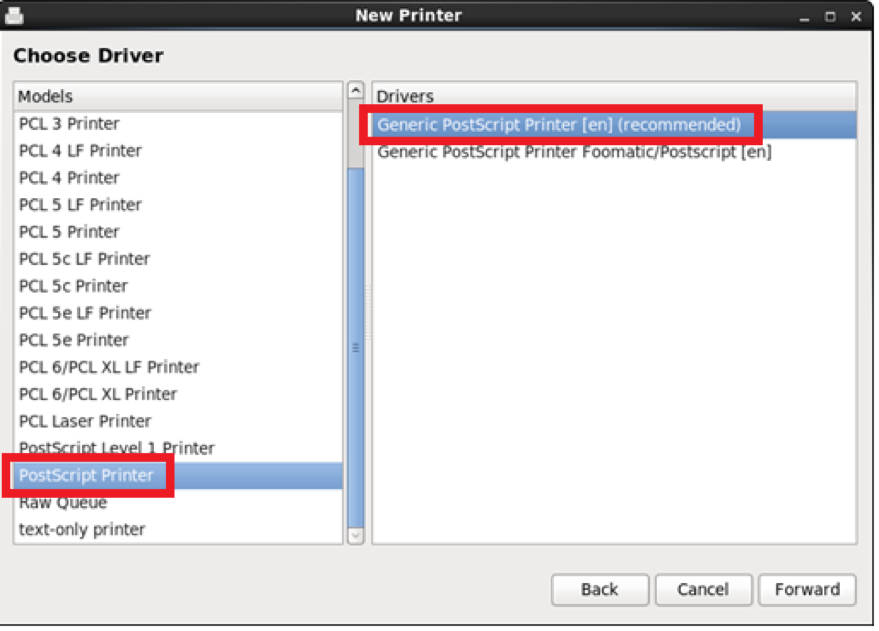
- If the brand of the printer is not listed, select Generic and click Forward.

- Select PostScript Printer from the left side, and Generic Postscript Printer [en] from the right side.
- Click Forward.
Important: There are two prerequisites for SAMBA printing:
- Your machine's IP address must be on the SAMBA access list.
- You must have a valid ENCS account.
To add a SAMBA printer, follow these steps:
- Connect to SAMBA server “printhost-um.encs.concordia.ca”
- There are two ways you can do this:
In the Run Window, type:
\\printhost-um.encs.concordia.ca\name_of_printer
(name_of_printer is the real printer name)
If you don't know the name, don't type anything.
- There are two ways you can do this:

Double click on the following desktop icon. By default, a useful shortcut link will be placed on your desktop which looks like:

- Alternatively, type \\printhost-um.encs.concordia.ca on your address bar in your "My Computer" window:

- Enter your ENCS username and password when the system prompts. The username/password must be a valid ENCS account.

- Add selected printer(s) to your system. After you are successfully authenticated by the SAMBA server, you will see a complete list of samba printers. These are our available ENCS managed samba printers.

- Double click your selected printer.
The system will open a “connecting a printer” window which will prompt you to install the printer driver. Click "Yes" to continue.

- The computer will connect to the samba server and download the driver.
Please be patient - this might take 2-3 minutes depending on the network and the size of the required drivers. - Finally, you will see the new installed printer on your system.

- You should print a test page to verify that the printer setup was successful. Right click on the printer icon and select "properties"

- Click on “Print Test Page,” and then verify that the test page actually printed.
To add an LPR printer, follow these steps:
- Find the name of the ENCS-managed printer (General access EV building printer, General access Hall building printer, Faculty & Staff EV building printer, etc.) you would like to use.
- Open Print Center utility from /Applications/Utilities/Print Center or from System Preferences, select Print & Fax.
- The first time you run the printer setup, you will be prompted to add a printer. Click Add - if you have installed a printer before, just click the + sign.
- Type the hostname of the printer server, i.e. printhost.encs.concordia.ca, in the Printer Address field and type the name of the printer in the Queue Name field.
- Select the model of the printer from the Printer Model pop-up menu, select the Model Name, then click the Add button.
- You can add additional printers or quit the Printer Center utility.
Note. Due to technical reasons, iMac and Macbook computer cannot print to ENCS printers via the Concordia wireless network. They can only print to ENCS printers via the ENCS wired network by means of LPR printing.
Note: You should be connected to the ENCS wired network to print on an ENCS printer.
Quick printing to ENCS printers:
If you don't need to permanently add a printer, you can use the following command to print:
Run: cat yourfilename.pdf | smbclient '\\printhost-um.encs.concordia.ca\nib' -U yourENCSusername -c "print -"
In the above example, we are printing to nib. The hostname will be different if you want to print to another printer.
To permanently add ENCS printers to your user-managed system:
- Open a new terminal (it can be as your regular user), and then run: system-config-printer.
- In the Printer configuration – localhost window, select New Printer.
- In the left pane, Select Connection and choose Windows Printer via SAMBA.
- The SMB Printer configuration in the right pane, should be entered as follows:
Next to smb://type csglobal/printhost-um.encs.concordia.ca/stamp
stamp is used for the purpose of this example. - Select Authentication required: Enter your ENCS username and password.
- Click Verify... (If accessible →Forward)

- Click OK, then →Forward.
- To obtain the printer specifications, query our printer database using the name of the printer as the parameter. You will need the Model for next step.
- Check Select printer from database, choose HP and then click Forward. In this example, we are adding the printer stamp. If you're adding another printer, consult the Printer Database as the model could be different.

- From the Models list, select LaserJet 4200. The default Driver that is selected is HP LaserJet 4200 Series Postscript [en] (recommended). Keep this default option.
- Click →Forward.

- In the New Printer window, you are offered the possibility to configure additional hardware Options. Printers like chalk, nib, marker and stamp, have the duplexing feature, therefore check Duplex Unit and then click →Forward.

- Enter the Printer Name, then Apply the information.

- The printer is now available from File → Print list

FAQ
ENCS printing quota is as follows:
- Full time employees: unlimited printing.
- A page count will be kept for each individual user. This is to ensure that faculty and staff do not run out of quota at any time.
- Part-time instructors: 500 pages per course, per semester.
- Students taking a course: no printing quota, neither at the undergraduate nor graduate level.
- Students doing research, visiting researchers, and post-doctoral fellows: no printing quota, it is also no longer possible to transfer quota from a faculty member to a student/visiting researcher/post-doctoral fellow.
Only faculty and staff can print to ENCS colour printers. Students who need a colour printout must give the document to their professor to print or use the Concordia DPrint service.
You’ll commonly want to print two or more lecture slides on each paper. It is quite easy in Adobe and Power Point’s print dialog box. You can also use this feature in combination with double sided printing.
PDF Slides
Open the Adobe PDF file you wish to print.
Step 1: Select File > Print and the Print dialog box will open.
Select the printer you want to use from the Name drop-down box. (e.g. engraving)
Step 2:
In the Page Scaling drop down box, choose “Multiple pages per sheet.”
Step 3:
Select the desired number of pages to be printed per page from the “Pages per sheet” drop-down box and the Preview reflects the multiple pages as well.
Step 4:
Click OK
Acrobat prints the lecture slides with the specified number of pages per sheet.
PowerPoint Slides
Open the PowerPoint file you wish to print.
Step 1: Select File > Print and the Print dialog box will open.
Select the printer you want to use from the Name drop down box.(e.g.castell)
Step 2:
Choose Handouts from the Print what: drop-down box.
Step 3:
Choose the number of slides per page from the Slides per page drop-down box in Handouts section.
Step 4:
Click OK
PowerPoint prints the lecture slides with the specified number of slides per sheet.
A HP Scanjet 5590 Digital Flatbed Scanner is available to all ENCS users in the following computer labs:
- EV building: EV009.245
- Hall building: H966
The scanner enables students to scan documents and course notes to a wide range of file types.
Following are the general guidelines for the use of scanner:
- The scanner is a shared resource to all ENCS users.
- ENCS users are eligible to use the scanner on a first come, first served basis.
- Limit your session time in case if other people are waiting. You can always wait for a second session.
- If no one is waiting for the scanner, you may use scanner to finish your job.
NOTE: If you don't need to use the scanner, do not login to the scanner computer.
To cancel your print job, you must contact the Service Desk.
Do not reboot the printer or cancel the job from the printer panel.
Printing double-sided (duplex) allows you to print on both sides of the page. This type of printing differs based on the operating system and printer you use.
Windows
Based on the printer model, printing double-sided in Windows environment differs.
HP Laserjet 4200 (ex: chalk, destiny, panda, stamp, marker, etc.)
- From the print dialog (File>Print), click on Preferences and you should see a dialog box.
- Click on the Finishing tab
- Check Print On Both Sides option
NOTE: The printer will use the paper size selected in your application. Selecting the Book Layout allows you to format a document as a booklet. In Booklet Printing, your pages are reordered and printed two-up on each side of a sheet of paper. This allows you to fold the paper in the middle, forming a booklet, and have the pages in the correct order with no page shuffling. This option requires 2 Pages per Sheet and Print on Both Sides. These options will be automatically selected when you select Booklet Printing
HP Laserjet 4000/4100/8100 (ex: faculty, grad, project, crane, tiger, etc.)
- From the print dialog (File>Print), click on Preferences and you should see a dialog box.
- Make sure you are under the Layout tab.
- To print on only one side of the paper, click None. To print on both sides of the paper, click Flip on Long Edge or Flip on Short Edge. Flip on Long Edge prints pages that read like a book. Flip on Short Edge prints pages that read by flipping over like a notepad.
Linux/Unix
From the command line:
qpr -d -P<printername> <file.ps>
To print duplex:
lpr -P<printername> -o sides=two-sided-long-edge <file.ps>
lpr -P<printername> -o sides=two-sided-short-edge <file.ps>
The -o sides=two-sided-short-edge option is suitable for landscape pages, while the -o sides=two-sided-long-edge option is suitable for portrait pages.
To print on a range of pages
lpr -P<printername> -o page-ranges=1 <file.ps>
lpr -P<printername> -o page-ranges=1-4 <file.ps>
lpr -P<printername> -o page-ranges=1-4,7,9-12 <file.ps>
To print duplex and on a range of pages, combine 2 options
lpr -P<printername> -o sides=two-sided-long-edge -o page-ranges=1-4 <file.ps>
IMPORTANT: You must send a postscript (.ps) file. If not, many extra pages will be printed and your print quota will not be reimbursed.