Email - Faculty & Staff
University employees are automatically assigned a Microsoft Exchange Online email account. Microsoft Exchange Online is a cloud-based service hosted on Microsoft 365 infrastructure located in Canada. Major features include calendaring, contacts, tasks and an email archive. Employees can access their email using Outlook on the web or by using the official Microsoft applications for desktop and mobile platforms. Some of the important advantages of using this platform are large mailboxes (100 GB), higher reliability, self-service email recovery, and built-in support for enhanced mobile connectivity
Who can use it?
Active faculty & staff.
Some employees are entitled to retain their email account after they retire (please consult your collective agreement).
Part-time faculty are entitled to retain their email account for 13 months from the start date of their contract.
How much does it cost?
There is no cost associated with this service.
How to get it
Email addresses for new staff are automatically provided
- To access your email account, you can use Microsoft Outlook for Windows, Mac or Outlook Web Application. The link to access your email can also be found on Carrefour's My CU Account page.
- For configuration instructions, please view the Documentation section on this page.
- To change your email address or the way your name appears in the global address list, contact the Service Desk.
Service availability
24/7
Documentation
Term: Username (User Principle Name - UPN)
Description: Your UPN is the same as your primary email address. You use it to log into your email account and other Concordia systems. However, if you wish to change or customize your email address name, you can create an alias email. See the procedure in the FAQ section below. Your original primary email remains active and available.
Term: Password
Description: Your password is the one you must use to log into your email account and other Concordia systems.
Term: POP/IMAP
Description: POP or IMAP are protocols used by legacy email applications
Additional information: https://docs.microsoft.com/en-us/exchange/clients-and-mobile-in-exchange-online/pop3-and-imap4/pop3-and-imap4
- To access the web version of Outlook, please open a browser and go to – https://outlook.office.com/
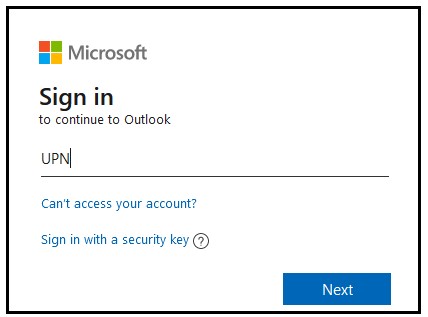
- If prompted to login, enter your UPN (your UPN is equivalent to your primary email address) and select “Next”
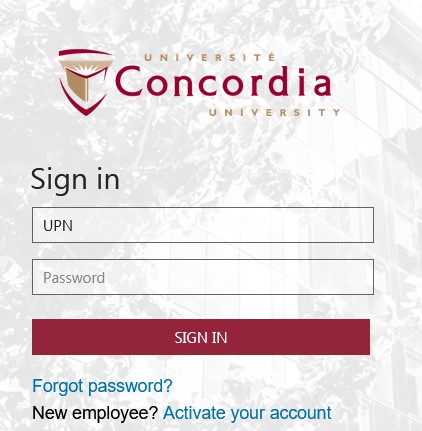
- You will be redirected to a Concordia login page where you will enter your UPN and your password
- Please note: You may be prompted to verify your identity using your preferred method as part of the Multi-Factor Authentication (MFA) initiative.
- The Outlook Web Application will open
- On your Concordia owned machine please open Outlook.
![]()
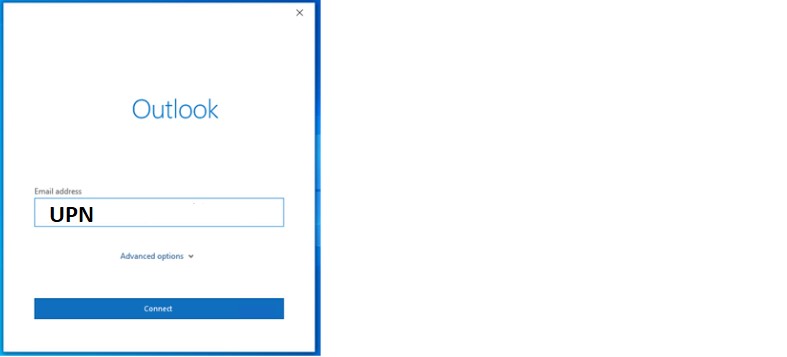
- If your computer is on campus, or connected to the VPN, Outlook will prompt you to enter your UPN and click on “Connect”
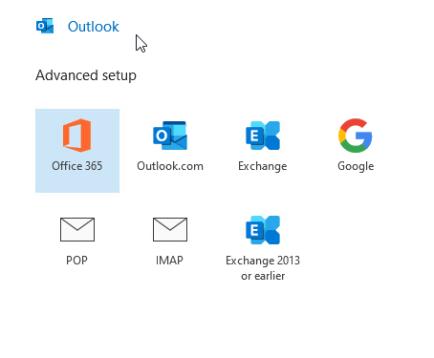
- Please select Office 365 from the list of options.
- Please enter your UPN as your username and your current network password. Select “Remember my credentials” to avoid reauthentication when restarting Outlook.
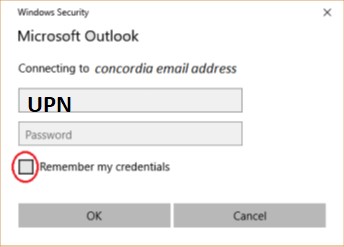
- Outlook will validate your account and connect to the server.
- Please note: You may be prompted to verify your identity using your preferred method as part of the Multi-Factor Authentication (MFA) initiative. Once your account is added, please uncheck the “Setup Outlook on my phone” if you do not wish to add Outlook to your phone. Then select “Done”.
- Outlook will begin downloading your mailbox, and you can begin using Outlook.
Concordia strongly recommends using Outlook instead of the Apple mail client.
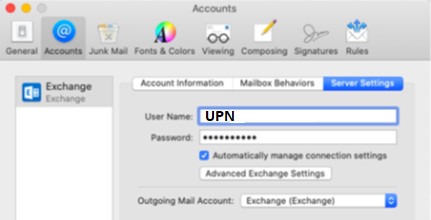
If you prefer to use the Apple mail client, do the following: In “Mail”, open “Accounts”, select your account and switch to the “Server Settings” tab. Make sure you enter your email address as” Username” and your current password.
Concordia strongly recommends using Outlook instead of the Thunderbird mail client.
If you prefer to use the Thunderbird mail client, do the following:
With the implementation of Multi-Factor Authentication (MFA), a version of thunderbird that supports modern authentication is required.
In Thunderbird, select your account in the “Accounts” section. Select “View Settings for this account”. In the “Server Settings” enter outlook.office365.com as the “Server Name” and your UPN as the “Username”. In the “Outgoing Server” (SMTP) tab, enter outlook.office365.com as “Server Name”.
Here is a short summary of the parameters you must apply to your Thunderbird mail client:
Incoming IMAP
Server Name: outlook.office365.com
Username: Your UPN
Port: 993
Connection security: SSL/TLS
Authentication method: OAuth2
Outgoing SMTP
Server Name: outlook.office365.com
Username: Your UPN
Port: 587
Connection security: STARTTLS
Authentication method: OAuth2
FAQ
Your username is your UPN which is the same as your primary email address, and your password is the same as the password associated with your netname. For more information, visit the Netname account management page.
Mail can be checked through Outlook Wen Application at https://outlook.office.com/. Outlook Web Application makes it easy to manage your emails, calendars and contacts by providing access to your content from virtually anywhere.
The standard email address format for Concordia employees is: firstname.lastname@concordia.ca.
This standard format applies to all addresses unless a customization request has been made
Yes, you can customize the name of your email by adding an alias email. To do this, please contact the Service Desk.
The global address list is a directory feature for Microsoft Exchange. All Concordia email addresses are published in the GAL. The GAL can be seen in the 'contacts' section within Outlook Web Application and Microsoft Outlook email clients.
To set a vacation message using Outlook on the web, click on 'Options' and then 'Set automatic replies'. If you wish to set an end date for your vacation message, simply check the box next to 'Send replies only during this time period’ and enter the applicable dates. Type your vacation message in the box provided. To send your vacation message to people outside of Concordia University, check the box next to 'Send automatic reply messages to senders outside my organization' and include your vacation message in the box provided.
Full-time faculty and staff have a quota limit of 100 GB, while part-time faculty and staff have a quota limit of 50 GB for email storage. If you would like to archive mail on your own to free up space in your primary mailbox, consult the Online archive mailbox FAQ section at the end of this page.
If you want to free space in your inbox, here are some suggestions. If you would like more information, explanations or help managing your email, contact the Service Desk.
1. Determine which folders are using the most space.
It is important to know which folders are using up more or less of your quota on the server. Once you determine this, it will help in choosing the appropriate resolution. To do so;
- Open Microsoft Outlook.
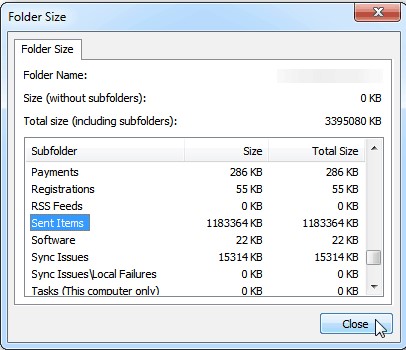
- Go to File > Tools > Mailbox Cleanup > View Mailbox Size.
- In this window you can view the total size of your mailbox in KB. Please note that there are 1024 KB in 1 MB, so the user in the screenshot has used approximately 3.2 GB of his/her quota.
- Below the total size of the mailbox and the individual sizes of the user’s various folders are listed. In this example, we can tell that the user’s largest, and therefore most problematic, folder is ‘Sent Items’.
2. Locate large mail items
By default, folders are sorted by date with the newest email at the top. You can sort any folder by size, name, or even the subject, by clicking on the title for that column. Choose a folder that is using a large portion of your quota and click on it to view its contents.
- Click on the ‘Size’ column to sort by size (see example below) and scroll to the top to see which email messages are using the most space. Delete or move the largest ones.

3. Save large attachments elsewhere
For the most part, emails with attachments take up the largest amount of space. Since there is much more space to store attachments in your ‘My Documents’ folder, consider saving attachments there and deleting the email. Here’s how:
- Click on the email with an attachment to highlight it.
- Click on File > Save Attachment to save the file to the local disk.
- Choose a location (i.e., My Documents folder), then click Save.
- Delete the email.
Remember that the email will only be removed from your Exchange mailbox once you empty your ‘Deleted Items’ folder.
4. Move mail from your primary mailbox into the online archive mailbox
- Select the mail (in bulk or individually) you wish to move from your primary mailbox.
- Drag the mail into your archive folder. In Outlook, the folder will be named: Archive Mailbox. In Outlook Web Application, the folder will be named: Online - Archive.
For more information about the archive mailbox or how to have mail moved automatically, consult the Online archive mailbox FAQ section at the end of this page.
5. Delete emails
- Deleting email – Your ‘Deleted Items’ Folder
- Deleted email messages are moved to the ‘Deleted Items’ folder where they can take up a lot of space. The most efficient way to clean up the ‘Deleted Items’ folder is to empty it. This is done by right-clicking on the ‘Deleted Items’ folder in the mail folder view and choosing ‘Empty Deleted Folder’.
- Deleting email – Your ‘Sent Items’ Folder
- One effective way to clean up your exchange mailbox is to delete unwanted email. Outlook automatically saves a copy of every email message you send in the ‘Sent Items’ folder, which can consequently grow very large. If you want, you can delete these messages to free up space.
You can also choose to delete your ‘Deleted Items’ automatically when you exit Outlook. Here’s how:
- In Outlook, click on the ‘Tools’ menu and select ‘Options’.
- Click on the ‘Other’ tab.
- Place checkmark beside ‘Empty the Deleted Items folder upon exiting.’
- Once you enable this option you will be asked to confirm the delete.
Yes, by default your email address will be published in the University directory. In addition, your email address will be published in the Global Address List found within Outlook Web Application and the Microsoft Outlook email client.
Concordia strongly recommends using the Outlook mail client.
To configure your device using the native mail applications, consult the Other (general settings) section at the end of General FAQ section.
Procedure for setting up mobile or tablet for iOS can be downloaded here
This message appears when you have used your Microsoft Exchange email on an ActiveSync mobile device. The feature simply allows the phone to be wiped of all personal information if it is somehow lost or stolen.
1. From within Outlook, click on “Calendar” and click on “Home” from the top toolbar.
2. Locate the “Share” section of the ribbon and click on the “Share Calendar” icon.
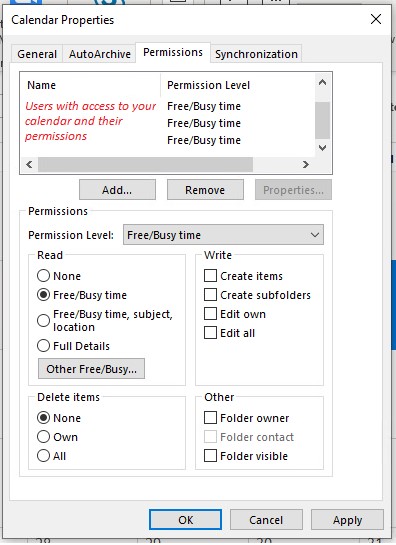
3. This is also where you will be able to adjust permissions if so desired.
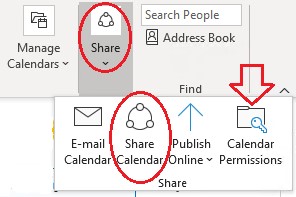
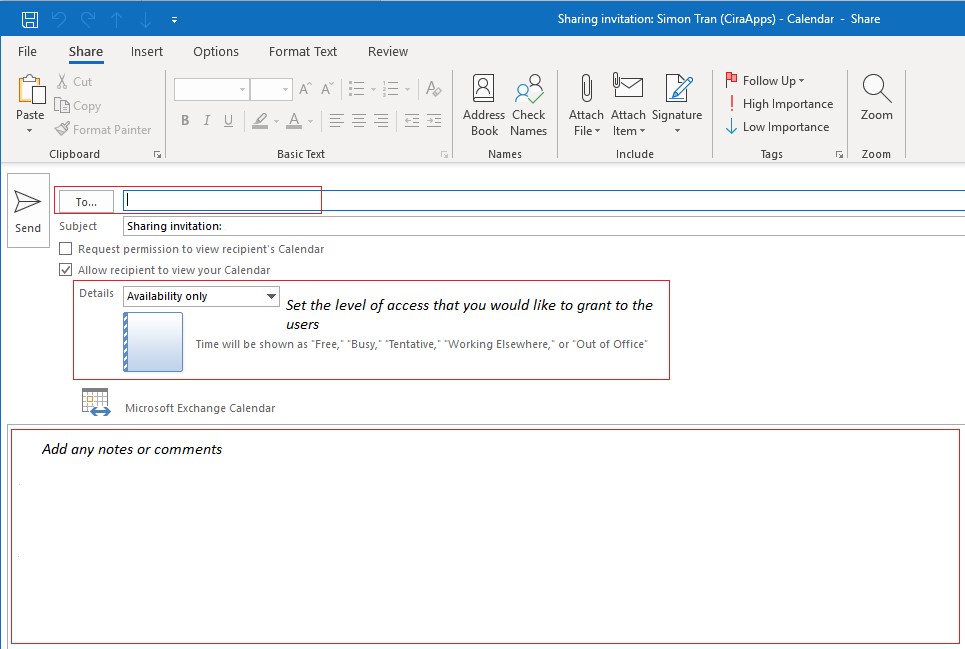
4. A new email will be generated where you can select the users you would like to share your calendar with, what level of access you would like to grant to them, and any other information that you would like to convey.
IT Security is a high priority for Concordia. Spam is a serious security concern as it can be used to deliver Trojan horses, viruses, worms, spyware, and targeted phishing attacks. Filtering systems have been implemented to block spam, and while these filters are highly efficient, you may still receive spam emails.
Important: Always keep your computer up to date with the latest updates and security patches for your operating system, antivirus software and any other applications you use. (If your computer is managed by IITS, the Windows updates are automatically installed).
Outlook has some features to help you control spam and manage your emails:
1. Unblock sender
- Click on Home
- Click on the Junk dropdown menu
- Select Junk Email Options from the menu
- Navigate to the Blocked Senders tab
- Click on the blocked email from the list of emails
- Click on Remove
2. Block sender
Use this option to block the sender of a particular email you received. This feature is useful when you receive recurrent emails from the same sender. If you block a sender, all future emails from that sender are considered spam.
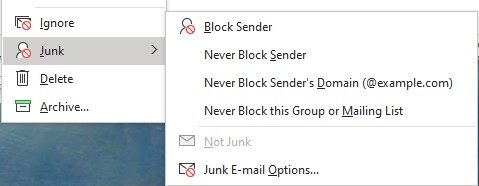
Right click on the spam email, select “Junk”, and then select “Block Sender”
3. Blocked sender list
Use this option to create a list of senders that are automatically blocked by mentioning the senders email address or domain name. All emails received from the domains and senders on the list are sent directly to your ‘Junk’ folder. This feature is useful when you receive spam emails from multiple senders using similar email addresses (like the same domain name) or if the list of spam email senders is relatively small. Use this option with caution as it may cause legitimate emails to be identified as spam. For example, if you block a domain, all the emails coming from addresses using that domain name will be considered spam.
To add an individual email address to your ‘Blocked Sender’ list you can select the email in your mailbox > Select ‘Junk’ from within the ‘Delete’ section> and click ‘Block Sender’.
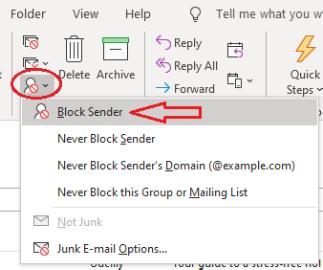
To add a domain or, multiple email addresses manually from the Home screen > Select Junk from within the Delete section> Select Junk Email Options and click the Blocked Senders tab. Click the Add button and enter an email address or a group domain.
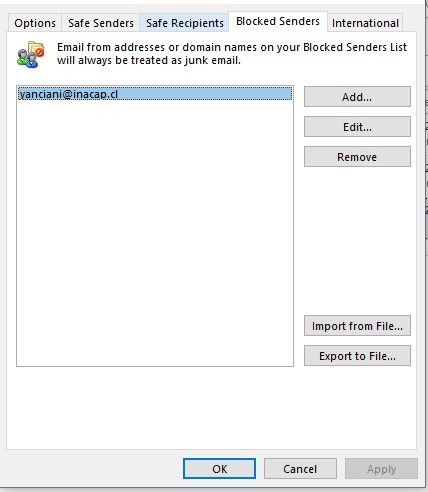
4. Junk email filter
Use this option to keep junk email messages, also known as spam, from cluttering your Inbox. By default, the Junk Email Filter is turned on, and the protection level is set to Low - the setting designed to catch only the most obvious spam. If you receive lots of junk messages from different senders, you can adjust the sensitivity of the Junk Email Filter to High so Outlook catches most of the spam emails. You should review messages moved to the Junk Email folder periodically, as some legitimate messages might also be moved.
Select Home > Select Junk from within the Delete section> Select Junk Email Options and click the Options tab. Select High for the level of junk email protection.
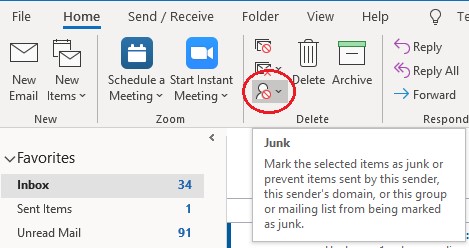

5. Create rules to manage your emails
A rule is an action that Outlook runs automatically on incoming or outgoing messages, based on conditions that you have specified. They help reduce manually filing or deleting when similar messages arrive. Rules are always turned on and run automatically. For example, when a message is received from someone you've specified in a rule, it’s automatically moved to the folder you designated.
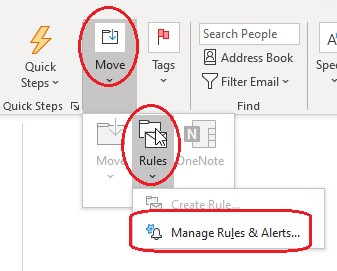
Here you can create a rule using the Rules Wizard by mentioning an action and the conditions that trigger that action.
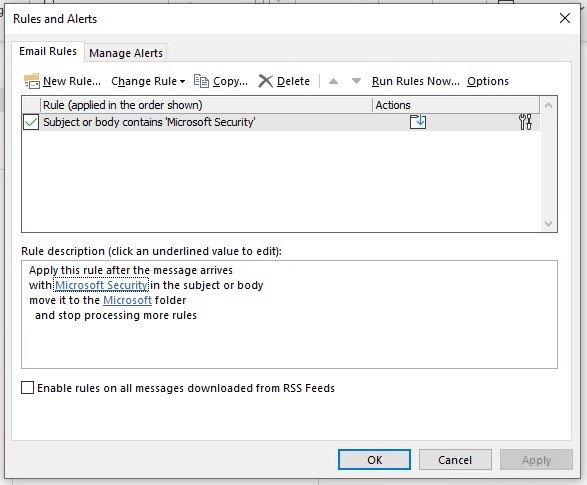
For more information, consult the MS Outlook support page.
Use with caution and check your spam folders often.
All the methods mentioned above are very useful, but you must use them with caution. Depending on the senders you block, the rules you set up, or the protection level that you set for the Junk Email Filter, some legitimate email messages might be moved to the Junk Email folder. You should review the messages in the Junk Email folder periodically so that you are not missing any messages that you want to see. Check your spam folders often at every level, especially if you're expecting a communication that never shows up.
If important messages that you believe should be in your Inbox often end up in your Junk folder, then you may want to review the settings and remove some of the blocked senders or lower the level of junk email protection you previously set.
Concordia provides IT training to faculty, staff, and students and training for Outlook is available. For more information, consult IITS Training.
To retrieve an email that you believe has been blocked by Concordia's spam filters, contact the Service Desk and provide the sender's email address along with the approximate date/time the email was sent.
The general configuration settings for an ActiveSync device are as follows:
If given the option, always choose Microsoft Exchange as the account type.
Email: firstname.lastname@concordia.ca
Domain: CONCORDIA
Username: your Netname
Password: your associated password
Description: Concordia Exchange
Your device should automatically populate the server field. Should it not automatically populate, you may enter mobile.concordia.ca
MyAnalytics presents you with insights and how you can use these insights to improve your work patterns. To access the dashboard, go to myanalytics.microsoft.com to open your personal MyAnalytics.
We encourage faculty and staff to learn more about using MyAnalytics through this FAQ guide or by watching this Microsoft video showing common benefits of using MyAnalytics.
The online archive mailbox is a specialized mailbox that works in conjunction with your primary mailbox, allowing messages to be quickly and easily archived to a location that is accessible from anywhere.
The online archive can help to free up space in your primary mailbox, which will lead to increased Outlook performance and will reduce complications associated with a mailbox approaching quota.
To move mail into the archive mailbox, select the mail (in bulk or individually) from your primary mailbox and drag it into the archive folder. . In Outlook, the folder will be named "Online Archive" and in Outlook on the web, the folder will be named "In-Place Archive".
Email clients that support the online archive feature include:
- Microsoft Outlook 365 and 2019 for both Windows and Mac, (with the most recent update applied)
- Outlook Web Application (https://outlook.office.com/)
If you would like more information on how to move mail to the online archive mailbox automatically, read the FAQ "What is the default policy?" below.
By default there will be no archiving or retention (deletion) policy applied to the online archive mailbox, which means mail will not automatically be moved.
There are 2 scenarios in which mail will be moved automatically:
- As your primary mailbox approaches quota, you will receive warning messages. If you do not reduce the size of your primary mailbox manually, the default archiving and retention policy will be applied just before the mailbox reaches quota so as to ensure you do not miss any new incoming mail. Once the policy has been applied to your account, it cannot be reversed.
- You may choose to opt-in and have the default policy applied to your account by contacting the Service Desk. Once you have chosen to opt-in, it cannot be reversed.
The default policy that will be applied when you opt-in or your primary mailbox reaches quota is as follows:
- All mail 2 years or older will be moved from the primary mailbox to the online archive mailbox.
- No mail within the online archive mailbox will be automatically deleted.
- All mail within the 'Deleted items' and 'Junk mail' folders will be permenantly deleted after a period of 90 days.
Select mail from the primary mailbox (in bulk or individually) and drag it into the online archive mailbox.
Tutorial video:
Select mail from the primary mailbox (in bulk or individually) and drag it into the onliine archive mailbox.
Tutorial video:
Select mail from the primary mailbox (in bulk or individually) and drag it into the onliine archive mailbox.
Tutorial video:
The quota for the online archive mailbox is 100GB.
Clients that support the online archive mailbox include:
- Microsoft Outlook 365
- Microsoft Outlook 2019
- Microsoft Outlook 2016
- Outlook for Mac 2016 (users can access the online archive, but can’t move multiple messages. Users must move individual messages or use OWA to move multiple messages).
- Outlook Web Application (OWA)
To search for mail that may have been moved to the online archive mailbox using the Outlook client, choose 'Search all mailboxes'. This search will find mail located in either your primary or online archive mailbox.
Yes - once the archive policy is enabled, any folder deleted in the primary mailbox will also be deleted from the online archive mailbox.
For example, if there is a folder called "Events" in the primary mailbox, a copy will be automatically created in the online archive mailbox. If the folder called "Events" is then deleted from the primary mailbox, it will also cause the folder with the same name to be deleted in the online archive mailbox.
To avoid this, rename the "Events" folder in the online archive mailbox before deleting it from the primary mailbox.